Saturday, June 21, 2008

5 kids + a full time student for a husband = crazy

Holy cow! It's been forever since I last posted! It would appear that I've not done anything, but that is just not the case. I've done a LOT, I just have had a hard time finding the time to post about it lately. You see, my very hard working hubby has just gone back to school full time, and I have realized how utterly lazy I was b-4 when he was a "normal" husband that came home from work every day and didn't spend all night doing homework. While I was pregnant with the twins and basically threatened to be put in the hospital indeffinatley if I did anything around the house my hubby did a LOT! And I'll be honest, I liked that! So I kinda let him continue to do whatever I didn't want to do for a while after the twins were born (I had to recover right?). Well, now he doesn't have time, so I'm back to doing just about everything I did b-4 the whole twin pregnancy thing (he still helps out a lot though), only now there are 5 kids to keep out of the dishwasher (though only 2 of them really try to climb in), and read to, and feed, and wash laundry for, and help with homework, and keep track of who went where etc. And somehow with all of this I do find time to do stuff, just not much time to post about it though. I'd like to change all that! So, I'm taking back my blog! I plan to post much more often than I have been.

Hmmm... now as I recall I left off at some yarn and batts? Well I'd like to finally share with you what I knit up with that first VERY bulky yarn that I spun on my wheel (I'd also like to note that I'm really happy with how this dyed up). It's a Quant, you can find the pattern for FREE online at http://www.knitty.com/ in their archives.

I did have to alter the pattern a bit to work with my yarn though. My yarn is MUCH more bulky than what was called for, so I used bigger needles, and took out one of the square repeats across. And it's a good thing too because this thing turned out just the right size. I think it would've been too big if I'd followed the pattern. Well, that and I would've run out of yarn. I only had about 90yds to begin with. So to anyone looking for a great project to knit up that doesn't take a lot of yarn I vote for this one!

Then there were some batts. Well I finally dyed them, and I must say I LOVE how they turned out! Just LOOK! These spun up like a DREAM! I spun some super fine singles, and navajo plied it (for those that don't know what navajo plying is it's a plying method that creates a 3 ply yarn with a single strand and can help to maintain colors for striping. You can see how it's done on http://www.youtube.com/) for a really pretty fingering weight yarn with really long stripes. I think the stripes are about 10 yards long or so. I have only spun up half of it so far, but I have about 220 yards so far (that's enough for ankle socks). Here's the yarn I ended up with:


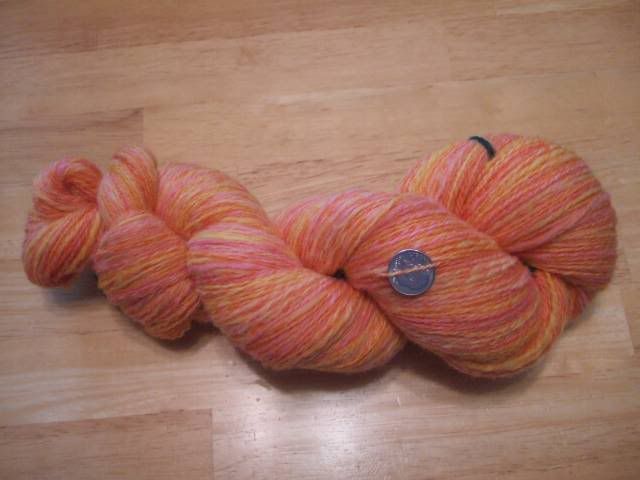
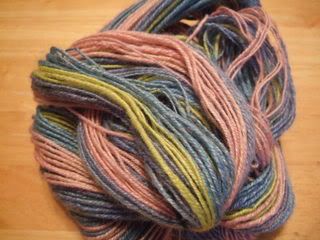
And then last but certainly not least there was that roving that I dyed. Well I'm happy to say that it turned out to be 513 yards of a fabulous fingering weight yarn! It'll make some really nice socks one day when I find just the perfect pattern. I'm calling it "Pink Lemonaid"


Well I think that's it for this post. I have lots more yarn to share, but that'll have to wait for another day. Now I have to go find the new stuffed doggy that my 3yo got for her birthday.
Have a great weekend!

Monday, March 24, 2008

A NEW HOBBY hehehe

I have decided that the fiber arts are fabulous! So naturally I've been researching all things crafty that you can do with fibers of all sorts. I love yarn, and become mesmerized when I see beautifully dyed yarn especially if it looks soft and shiny. So I figured making my own yarn would be so cool! I was right! My spinning all began very innocently with some reading, and more reading online. Then I figured I could probably do it after reading so much about it for months! So I ordered some wool, and headed to the craft store to pick up some supplies to make my own home made drop spindle. I then started playing with the wool and spindle. It was fun, but I wasn't real good at keeping the spindle spinning while drifting out my wool. So I hatched a plan to get a spinning wheel because it seemed to be right up my alley. Then disappointment set in as I realized that spinning wheels cost a bit more than 5 bucks! Okay, a LOT more than that! Luckily I knew where to ask (craftster has a great fiber arts forum)! I discovered a place that makes spinning wheels out of PVC pipe and a wheelchair wheel. As much as I love asking my hubby to make things for me that neither of us knows how to make I really had no idea how this thing should work when it finally is done. So how would I know if there was a problem or how to fix it? Yeah I wouldn't. So I somehow talked him into letting me buy something I had no idea how to use! LOL!! Isn't that nuts!? But my hubby is a really nice guy, and he likes to keep me happy, and he knew that I'd figure out how to use it. After all I learned how to knit and spin and make a spindle online, why not figure out how to spin there too? So I ordered this wheel that I'd heard great things about and the agony began. I thought I was going to die before it arrived. Luckily I survived though. And I LOVE it! It's just sooooo cool! Watching the fiber be spun into yarn is almost hypnotic. Plus now I get to play with all these great fibers! I also ordered a variety of fibers to spin on my new wheel (alpaca, angora, Bamboo, cashmere, mohair, nylon, firestar, silk, soysilk, and wool), and if you have all this fiber you gotta have something to blend it with right? Of corse you do! So, I ordered a drum carder too! HEHEHE and hubby put up with all of this so well! Though in my defence I researched all of it for months and stuck to a budgeted amount before ordering anything so there! hehehe

So I bet that a lot of you are wondering what on earth a PVC spinning wheel looks like huh? Well it looks just like any other spinning wheel only it's made of PVC hehe. Oh yeah and I have a pic to share too. It's more like a modern wheel, and no it doesn't look like the one that Sleeping Beauty pricked her finger on, though the 2 do the same thing.

Anyway, here's my wheel. Isn't it cool?

OH and if you're wondering what on earth a drum carder is. Well, it's a dangerous tool if you don't know how to use it right. It's used to combine fibers, or align fibers so that they're ready for spinning. They're also more than $5! Darn it! I ordered mine from http://www.coppemoose.com/ and it came with 8oz of "free" silk (as in it wasn't extra, but I had to plunk down the $$ for the carder to get it, is that really free?? hehe). Oh silk is soooooooooo soft! I'm gonna have fun spinning it! So here's a picture of my Strauch "Petite" (it's not small) Drum carder.


Anyway, I ordered a kit rather than a pre-assembled drum carder. It saved me $15 and I got to learn how it was put together. That's how I know it can be dangerous! I was moving it, and poked my thumb on it, and made it bleed! See!


So a word to the wise, DON'T touch the spikes on your drum carder and you'll get along better with it!

So of course having these new toys gives good reason to USE them right!? So here are my latest projects.
This one is my first hand spun yarn.


Here's a picture of the first fibers I carded together, pulled into roving, and dyed. It's 25% nylon 75% wool. I'm hoping to spin it into sock yarn one day. Though I think I'd like a little more practice to get more even yarn first.


And this one is a 2oz batt of wool/silk that I carded together. It's about 1/3 silk 2/3 wool. The silk makes it shiny. I'm going to dye this one, but I'm not sure what colors yet, and I'm not sure what weight it'll be when spun. I'm waiting for it to tell me what it wants to be. Right now it's happy being a beautiful cloud of fiber.

Be sure to check back later. I've dyed up the handspun yarn, and I'm working on a hand knit headband (too bad it's getting warmer huh? did I just say that?! I hate the cold! But you don't wanna go running around in a wool headband in the middle of summer. oh well, one thing's for sure, winter always comes again around here!). Hopefully it'll be done soon! I can't wait to see it when it's done!
Have a great day!

SOCKS!

I have socks! For those of you who haven't been bitten by the sock knitting bug you may find it hard to believe that I'm having so much fun taking so much time making something that I'll just put holes in by wearing them around on my feet! But it's true! I've been bitten by the sock bug! Socks make a great knitting project for so many reasons!
1. They're reltively small, and therefore can be finished quickly.
2. You can do any number of beautiful patterns on socks so they're always interresting.
3. There's so much lovely sock yarn out there, and knitters just wanna try it all!
4. You can't buy the beautiful socks you can knit.
5. They're warm!


See! I've just listed 5 reasons off the top of my head why socks are so great! And I'm sure all the sock knitters out there can come up with many more! So now hopeflully you know why I love to knit socks, and if you don't, well... maybe you should try some for yourself and see!


I bet you wanna see some of these socks that I love to knit don't ya? Okay! here ya go.
This is the first pair of socks that I ever knit. They're the Baudelaire sock pattern FREE from http://www.knitty.com/ I made these from some wool/nylon sock yarn in burgundy. I love them. They took me forever, but that's what I get for going for fancy shmancy lacey socks on my first pair. But this is what I wanted to knit, so I did. This first pic is of them on my needle. I'm an impatiend knitter and for fear of never making the second sock I made them 2 at a time on one long circular needle. It's not as hard as it sounds. Just a litte trickey to keep your yarn from getting tangled up seeing as how you need to knit from 2 different skeins of yarn at a time. Anyway enough rambling about these socks. Here are the pics.


Here's a pic of the socks fresh off the needles.


Here they are on my very happy feet!


These are some toddler socks I just kind of made up. I thought it would be cute to knit some socks for the twins. So I knit up a swatch with some yarn that I found at an adorable little yarn shop in South Jordan called "From Robbin's Nest" It's all acrylic which I thought would be good for toddlers since they don't take real great careo f their socks anyway. And mostly I just wanted to make some cute socks!


This is pair of socks that I just finished up today. I used the generic toe-up sock pattern from Knitty.com (sorta, I read the pattern once, then kinda guessed on the rest). These are made with my own hand dyed yarn, in a colorway I'm calling "Mint Dream". The design part of the socks is kind of a play on seed stitch. I saw a REALLY expensive sweater in the mall with this stitch pattern, and figured I could just do it on socks to see how I like it.
It's really simple.
row 1: K2, P2 across the top,
row 2: repeat row 1,
row 3: P the K's and K the P's.
row 4: repeat row 3.
Repeat rows 1-4 for the pattern part of the sock. Makes for a fun texture.
So here's a close up of the pattern.


Here's the side view.


And here are my happy feet.
I'm not sure what pattern I'll use for my next socks yet, but I already have the yarn! I do however have a few projects that I feel obligated to finish b-4 starting on a new one. So it could be a while before I get anymore socks done. But I hope you like looking at my socks as much as I like wearing them! LOL
Happy Crafting!

Thursday, January 31, 2008

Lookie what I finished!

I have always wanted to make a sweater for myself. Ever since I first learned to knit 17 years ago, as I sat there becomming more and more frustrated with each row because I kept finding mysterious extra stitches, then I would think of how cool it would be to make a sweater I could wear. Then I decided it wasn't worth it because I just couldn't seem to figure it out (I was very young at the time, give me a break).

Then I came across a beginners sweater pattern on Craftster.org, (I just found the link again, here's where I found the pattern http://www.craftster.org/forum/index.php?topic=152316.0 )and just had to try it out. It didn't go seamlessly (no pun intended), I nearly re-wrote the pattern to get it to fit, but as was stated in the pattern I used it was more if a guide anyway. And it got me to finally make the sweater I've been waiting so long to make. So the only thing I have to say about the pattern was that it didn't fit me. It's still a great guide!


So I'm very happy to FINALLY be able to show off a sweater that I knit! I really like it! It fits me just like I wanted it to, I think I'll wear it everywhere! I bet you'd like to see some pictures of it huh? Well, first you have to look at the first picture I took.


When I tried it on at this point it was apparent that it was going to be WAY too big! So, the next day I frogged the whole thing! :( It was sad, but luckily I hadn't gotten too far. So I started over with smaller needles, and with WAY fewer stitches than the pattern called for, and ta-da! It fit! And I love it.

I made a lot of changes to this pattern. So many in fact that I thought I'd type up my pattern for anyone who may want to replicate this sweater the way I have. I, however have VERY limited pattern writing ability at the moment, so to keep things simple I will just type out the instructions for the size I made, and allow you to adjust for your size. I wear a size 6, and have a 36" bust and 27" waist (I have 5 kids! Not everyone can have a 24" waist forever!) just to give you an idea of what sized person this fits. So, without further delay, here is the pattern that I made:

Top Down Raglan Sleeve Sweater Pattern

written by Michelle of Designs By Michelle

size: Woman's Small

Materials:

Yarn: 1 skein Caron Simply Soft in country blue, one skein of Caron Simply Soft in gray heather.

Needles: one 24" circular needle size 6 US

one 24" circular needle size 8 US

one 32" circular needle size 6 US (for using the magic loop method for the sleeves), OR a set of size 6 US DPN's

one 32" circular needle size 8 US (for using the magic loop method for the sleeves), OR a set of size 8 US DPN's

4 stitch markers

1 yarn needle

Gauge: 16sts/25rows=4" in stockinette stitch on size 8 US needles

Special instructions: Each stripe is 13 rows long, however instructions for color chage are not always indicated. Remember to change colors as needed. Feel free to make your stripes as wide or narrow as you wish, or add cables to a solid color sweater.

Abbreviations:

Kf&b=knit into the front of a stitch, then without sliding the stitch off your needle knit into the back of the same stitch. (one increase made)

K= knit

P= purl

SSK= slip slip knit

K2tog= knit 2 together

M1= make one increase

st st= stockinette stitch (knit all stitches in the round)

St(s)= stitch(es)

MC= main color (blue in this pattern) CC= compilmentay color (gray in this pattern)

Begin

Using size 6 US 24" round needle and MC, cast on 120 sts, join in the round being careful not to twist sts.

working in K2, P2 ribbing place a stitch marker after 39 sts (these sts just worked will be the front), continue in K2, P2 for another 21 sts, place marker (sleeve), continue for another 39 sts, place marker (back), continue again for 21sts, place marker (2nd sleeve).

continue to work in K2, P2 ribbing for 2 1/2" slipping markers as you come to them, break yarn leaving a tail to weave in later.

Switch to CC and size 8 US 24" circular needle. K one round slipping markers as you come to them.

Increase round: Kf&b, *k to 1 st before 1st marker, Kf&b, slip marker, Kf&b* repeat from * to * to end of round.

next round: K all sts

repeat these two rounds 11 times more, K 3 more rounds.

Try on sweater: Slip half of your stitches onto waste yarn or onto another round needle, and try on sweater. If the sleeves meet under your arm then continue, if not you may need to adjust the pattern by doing more increase rounds.

K to first marker, remove it. Slide the stitches between 1st and 2nd marker onto a stitch holder, or waste yarn, slide 2nd marker as usual. K to 3rd marker, remove it, slide stitches between 3rd and 4th marker onto waste yarn or stitch holder, slip 4th marker as usual. continue in st st until piece reaches 3" from underarm.

Begin decreases for waist as follows:

*K1, SSK, K to 3 sts before marker, K2tog, K1* repeat one time more.

K 4 rounds

repeat these 5 rounds 4 times more

K 4 rounds (Try on sweater again, you should be to your waist by now)

hip increase round: K1, M1, K to 1 st before marker, M1, K1, slip marker, K1, M1, K to 1 st before marker, M1, K1.

K 4 rounds

repeat these 5 rounds 4 times more.

Using size 6 US 24" round needle and MC, work in K2, P2 ribbing for 2", bind off loosly.

Sleeves: (make 2)

with 32" size 8 US needle or size 8 US DPNS put sleeve sts onto needle, and pick up and knit 3 sts, place marker, pick up and knit 2 sts under the arm to close the gap. working in the round, K 1 round (50 sts on needle)

decrease round: K1, SSK, K to 3 sts before marker, K2tog, K1

K 2 rounds

repeat these 3 rounds 2 times more (44 sts on needle)

K 2 rounds, switch to size 6 US 32" circular needle, and working with MC work in K2, P2 ribbing for 2", bind off loosly.

Finishing:

Weave in ends

Show it off!

I'd love to get feedback on this pattern if it makes sence and if it works for you if you use it. This just happens to be what worked for me. I hope it'll work for someone else as well!

Saturday, January 19, 2008

The quilt 4 years in the making!


Greetings! Today I would like to share with you the journey that I took to get to a completed quilt.


One day about 4 years ago I met a lady who loved quilting, and she was working on a beautiful quilt with butterflies on it. The moment I saw it I thought that this would be perfect for my oldest daughter (she was also my only daughter at the time). So I got the pattern, and the fabric, and cut it all out. I was sooooo excited about how beautiful this was going to look in my daughter's room. She loved butterflies, and I was planning to stamp her room with butterflies. It was going to be the most beautiful butterfly themed room that a little girl could ever have. However, after cutting for what seemed like days I realized that maybe this wouldn't be as quick as I had origonally thought. But it was all straight seams, how hard could it be right!? I mean I'd had 12 years of sewing experience for heaven's sake. Straight seams were as easy as it gets! (Let me take a moment here to add a side note. The pattern that I was working from was for a wall hanging sized quilt, I had to make 6 of these wall hanging sized panels and add some borders so as to make it big enough for a bedspread. This added tremendously to the task. The picture I had didn't seem so time consuming until I realized that I was multiplying it by 6!)


Anyway, so there I was with all my pieces cut out, I was ready to start sewing. And start I did. I got almost one whole block put together. It only took me a day to get that done. I'd be done with this thing by the end of the week! Only then life happened. I had 2 young children to take care of, and tiny quilt pieces are not child friendly. So, I stuck all the pieces safely in a shoebox along with my pattern, thread, and pieces that I'd sewn together so that I could grab it at any time that I had to sew, and work on it. Well... it sat in that shoebox for 4 years! I did pull out what I'd done from time to time to look at them, but the fact that there were over 600 pieces still needing to be sewn together was overwhelming, so it always just went back into the box. Then in October of 2007 I decided that I was not going to just pull out those pieces and look at them just to put them right back anymore. I needed to clean out my craft room, and all the materials for this quilt were taking up a lot of space! If I just got that thing done then I would clear out one more unfinished project from my craft room, and my daughter would finally have one more piece to complete her perfect room. And she wasn't getting any younger. By now she was 7! This thing was so much work that I wanted her to get as much use out of it as possible before she outgrew her butterfly infatuation! Plus it'd make a great Christmas gift. So I set to work. I sewed, and sewed, and sewed, and... well you get the idea. I think I sewed for miles to get that quilt top done. By this time I'd discovered Craftster, and as luck would have it there is a great quilting forum there. I had asked a bunch of questions about machine quilting (because let's face it, if I was going to hand quilt this thing it'd be another 4 years before that thing was finished!). And I came across a quilt frame that can be used for machine quilting on a regular old sewing machine. The only problem was that it was way out of my price range. So I talked to my wonderful husband, and he decided that he could make me something like it for quite a bit less. He's so handy that way! So several weeks later it was finished! The picture above is the quilt on the frame DH made. It was ever so handy. I had the quilting done in 2 days! Ahhhhh.... it was great to finally have this thing finished. I hope to never again take this long to complete a craft item. But I can't make any promices. I do have 5 kids after all!

Anyway, sorry the pics are all at the top. I need to learn how to format my posts better. The first one is obviously a close up of the butterflies (it's kinda hard to make out, but the butterflies are quilted with metalic thread), the 2nd one is of the quilt in DD's room, and the 3rd one is of the quilt on the frame made by DH.

Enjoy!

Friday, January 18, 2008

I've been kitting up a storm!


While I plan to post on fewer than 15 items in future posts here are the pics that I have of my somewhat recently completed knit projects.
Also, I have made some new year's resolutions. One of them is to write something on my blog more often than I did last year. That should be easy because last year I had a total of about 3 entries! Another of my resolutions was to use up most of my yarn stash before buying yarn, unless it was needed to complete a project that I was making from my stash. Ummmm.... I already broke that one! LOL!! I couldn't help it! There are just too many great projects on Craftster that I want to make, and one only gets a limited number of 50% off and 40% off coupons to Michael's and Jo-Ann's in a lifetime! If you don't use them you loose them right!?
While I did buy yarn, at least I have been widdling away at my stash. I think I've been using it faster than I've been buying it. I bought 3 skeins, and I've used about 5 or so. I got some caron simply soft for a cute sweater that I hope to be able to finish and post about b-4 it gets too warm to wear it, and some bernat's cotton tots for facecloths. I have discovered that I love to knit facecloths because they're quick and can be so cute! And I love to wash my face with them. I've also knit up a sweater on my Ultimate Sweater Machine that Santa brought me for Christmas (I was a good girl!), a hat also on the USM (it's a little big), 2 purses, nearly 3 pair of slippers, hats for all the kids and my neice (plus one that was going to be for my sister that turned out too small), 3 sweaters for the girls, mittens for my 2yo, and a washable pad for my swiffer wet jet. I think that's all I've knit since I last posted.
And DH thought this would be a passing phase! LOL! I think this new found obcession is here to stay!
Have a great day!


Monday, October 29, 2007

Re-learning to knit!


Holy cow! It's been a while since I last posted. I've been fairly busy though! The twins are now 9 months old, and if that alone hasn't kept me busy enough, I've also made baptism invitations for the daughter of a lady that my husband works with, FINALLY completed 50 poodle magnets for NEC (New England Crafters, http://www.magicalgift.com/) that I haven't sent in yet, nearly finished a quilt top with over 700 pieces that I started about 4 years ago, and re-taught myself to knit!


Why knitting you ask? Well, in my daily surfing I came across a great crafting web site: http://www.craftster.org/ and I have to say I think this is the most comprehensive crafting web site I've ever seen. They have a great forum for crafting of all kinds. I was inspired to finish my quilt top from all the great ones I saw here, and noticed they had a knitting forum too. So, I thought I'd check it out. My mom taught me to knit when I was about 13, but I couldn't understand the patterns, so I gave it up and decided to stick with crochet because I only had to keep track of 1 hook as apposed to 2 needles! Then about 7 years ago I decided that I wanted to knit a sweater for my oldest child (who was about 8 months old at the time). So I bought a learn to knit kit, and made the sweater. The silly thing is that I put it a way for a while because it needed some hand embroidery to be completed, and I just finished it a few months ago. Luckily I did have another girl, and it turned out way too big anyway, so I think it'll fit her even though she's nearly 3 (I'm giving it to her for Christmas). Anyway, I got to looking at the beautiful completed projects posted on craftster, and realized that there are just some things that can only be done right if you knit them! So, I have again begun to learn to knit. And this time I've already taken it a step or 2 passed knit and purl! I've done a little ribbing, and I've completed my very first cable stitch! I'm pretty happy with how it turned out seeing as how I only had this simple booklet to work with. I haven't actually made a real project yet. I'm just working with some scrap yarn, and messing around until I feel like I've figured out enough to actually make something useful. This swatch will most likely be a wash rag. I'm currently trying to figure out how to do a simple lace pattern. And I would like my first real project to be a pair of socks, but I haven't priced out the yarn for that yet, so we'll see if that really happens. In the mean time I'm having a great time learning, and looking at beautiful things I'd love to make. Oh yeah, and I learned how to make my own knitting needles out of wooden dowels. These pictures are of my current swatch that I'm making on my first set of home made needles, and a close up of the cabling! I'll post pics of my first completed project if I ever have one. And I'll also post pics of my daughter's quilt when it's completed. ENJOY!